 You probably want to read this before you turn your T-shirt into a backless tank top. I have received quite a number of requests for this tutorial, and few of them came with photos of how it went wrong. Get a hold of your scissors and behold, the truth about DIY tank tops!
I suggest you use something made of cotton, so it would be a breeze to wear, especially since it’s summer. Lay it out and get your scissors ready.
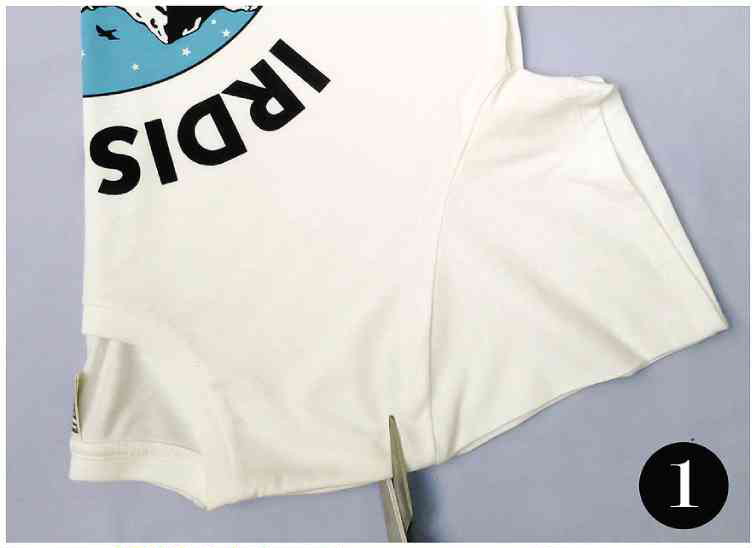
1 Vertically fold your shirt in half. Make sure that the tips are accurately paired so your cut would be parallel. Using your scissors, make a tiny cut-mark on the shoulder part where you’ll begin cutting later.
2 An inch or two from the underarm, make the same mark, like what you did for the first step. The inches vary according to how low you want your tank top to hang on the sides.
3 Make a tiny cut halfway, like what you did for steps 1 and 2. Do the same middle section cut on the other side of the shirt. The marks you made for steps 1, 2 and 3 will be your lead in cutting the sleeves off for step number 4.
4 As you cut, retrace the tiny marks you made earlier. By doing this, your cut won’t get lost. Start from the shoulder mark, then the middle, and end on the mark under the sleeve. Remember, no sharp edges! Make your corners round or oblong.
The size of your tank strap depends on how wide you want it to be. Just make sure you give an allowance. I advice half an inch on both sides, because the cut cloth tends to fold in, so the strap will get narrower as you wear it.
5 After removing both sleeves, stretch the armhole like you see in the picture. Lightly tug it out just to open it up more. This process also allows cloth to fold inward, and make the cut line less visible.
 6Trace the neck-band of your shirt with your scissors. Cut and remove it.
7 Photo number 7 shows how the neck-band was removed from the rest of the shirt.
8 Last step, fold the front side of your shirt in the middle. Make sure the points of shoulders are accurately paired. Cut from the chest area up to the shoulder area. This cut will make your neckline. Also, by doing this fold, you avoid making your tank top backless.
Remember:
a. No sharp edges when cutting.
b. Give allowance for the width of your tank strap.
c. Length of tank holes vary according to how low you want them to hang.
d. Tug and stretch for less visible cuts.
e. No cutting of front and back sides together to avoid backless tops.
And you’re done! Truth be told, this tank top tutorial is perfect for a printed shirt that is big for your body. A loose, non-backless tank top is the way to go to welcome your summer adventures, or when you want to feel breezy throughout the year! I hope you had fun doing this tutorial like I did, though if you really want a backless, four-sided, skin-baring tank top, feel free to cut away. As long as you feel comfortable wearing it then it’s all good! Have a creative, fun summer, and always remember—why buy when you can DIY?