 FRANKENSTEIN
Difficulty: 4 out of 5
What you’ll need:
Base coat
Top coat
Nail polish (green, white)
Acrylic paint (black, white)
Detailing and/or striping nail art brush
Dotting tools (optional)
The steps:
1. Apply a base coat to protect your nails.
2. Apply white nail polish on nails you want to transform into Frankenstein, and apply green nail polish on all the other nails. Wait for the polish to dry completely before painting your design.
3. Use the green polish to paint the shape of Frankenstein’s face. You may need two coats, depending on the opacity of your nail polish. Leave a small space on the side of your nail and leave space near the cuticle area for the hair.
4. Create an outline of the face and height of hair using the nail art brush and black acrylic paint. These lines will serve as guides when you start painting the monster’s hair.
5. Paint Frankenstein’s hair by drawing irregular triangular shapes. You can create your own unique hairstyle for your Frankenstein.
6. Use a detailing nail art brush to paint two black circles for the eyes. The circles don’t need to be perfect. Draw a screw on the forehead.
7. Keep the mouth simple by drawing a thin diagonal line.
8. Fill in the eyes with white acrylic paint. Leave a little of the black paint visible. Use the brush to add a stitch mark on the forehead.
9. Mix a small amount of white and black paint to create a gray color for the screw. Fill in the black shaped screw you painted previously with gray, making sure to leave a space on the edge so the screw will have an outline.
10. Add two small black dots on the eyes and a short stitch mark on the cheek. Create different expressions for Frankenstein by dotting the black dots on different parts of the eyes.
11. Paint random stitch marks on your other nails to complete the design.
12. Apply a top coat to seal your design.
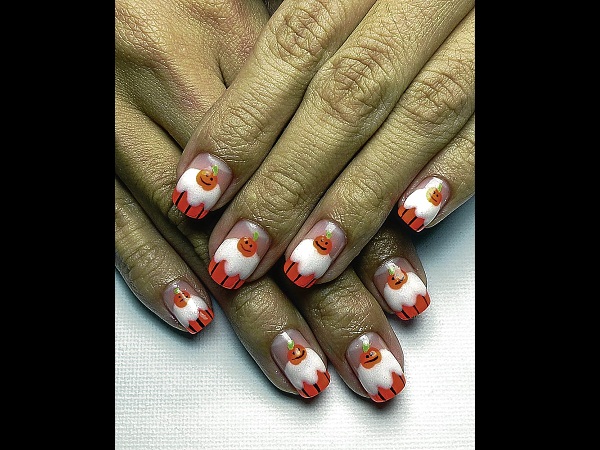
HALLOWEEN CUPCAKES
Difficulty: 2 out of 5
What you’ll need:
Base coat
Top coat
Nail polish (bright orange, white shimmer)
Acrylic paint (black, white, green)
Detailing and/or striping nail art brush
Dotting tool (optional)
The steps:
- Apply a base coat.
2. Paint the tips of your nails with orange polish. Cover at least 1/4 of your nail.
3. Use the brush to paint black vertical lines on the area you painted orange.
4. With the shimmer white nail polish, paint the contour of your cupcake. Using a dotting tool makes this step easy. Make sure you leave space for the small pumpkin that you’ll paint on top of the cupcake.
5. Fill in the cupcake with shimmer polish until you reach full opacity. Let the polish dry completely before proceeding to the next step.
6. Dab a slightly big orange dot on top of the cupcake.
 7. Dab another orange dot. Make sure it overlaps with the first one to create a pumpkin shape.
8. With green polish or acrylic paint, draw a stem on top of the pumpkin.
9. Paint a smiling face inside the pumpkin with black acrylic paint. This step is optional.
10. Apply a top coat.
SPIDER TIPS
Difficulty: 2 out of 5
What you’ll need:
Base coat
Top coat
Nail polish (bright orange, white)
Acrylic paint (black, white)
Dotting tool
Detailing and/or striping nail art brush
The steps:
1. Apply a base coat.
2. Paint the tips of your nails with bright orange nail polish. Cover at least 1/3 of your nail.
3. Using black acrylic paint, add two black dots on the top of your orange tip. These will indicate how big your spider will be.
4. Paint a black and horizontally inclined oval shape that will serve as the spider’s body. Make sure half is within the orange tip and half is outside.
5. Paint two legs inside the orange tip using the nail art brush. Make sure you paint one leg to cover the top edge of the orange tip and paint the longest leg inclining towards the middle of the nail.
6. Paint two more legs over the orange tip. Draw simple straight lines or paint bent legs.
7. For the eyes, dab two white dots at the bottom of the body. Use a white nail polish or acrylic paint for this.
8. Dab two small black dots within the white circles you previously made. Create different expressions by altering the positions of the black dots.
9. Dab smaller white dots onto the black circles. You can also paint the smallest dots red. This step is optional.
10. Apply a top coat.
PUMPKIN SILHOUETTES
Difficulty: 3 out of 5
What you’ll need:
Base coat
Top coat
Nail polish (five bright or light shades)
Acrylic paint (black)
Dotting tool
Detailing nail art brush
The steps:
1. Apply a base coat.
2. Polish your nails. Use a different color for each nail. Allow to dry completely before painting the design.
3. Using a nail art brush and black acrylic paint, trace the contour of your nail, except the free edge. Thickness should be approximately 2mm.
4. Draw a vertical line in the middle, about 1/3 from the top of your nail to the free edge. This will be your guide to how tall the pumpkin is and to know where the middle of the pumpkin head is.
5. Paint a semi-circle for the pumpkin. Make sure it touches both sides of the nail.
6. When satisfied with the shape, fill it with black acrylic paint.
7. Paint the pumpkin stem on top of the semi-circle.
8. Use a dotting tool to dab to make the eyes. Use the same nail polish you used for the background color.
 9. Paint a slightly curved line across the face to serve as the mouth. Again, use the same polish you used as base color for the nail.
10. Dab two smaller black dots on the eyes.
11. Add mouth details by painting alternating small vertical lines. Tip: Start on top. Draw a line in the center and one on each side before drawing the bottom vertical lines. This way, you will have even spaces in between the lines.
12. Apply a top coat.
HAUNTED HOUSE AND BLACK CATS
Difficulty: 4 out of 5
What you’ll need:
Base coat
Top coat
Nail polish (orange and white shimmer)
Acrylic paint (black and white)
Detailing nail art brush
Dotting tool
The steps:
1. Apply a base coat.
2. Apply orange nail polish on all nails and allow to dry completely.
3. Choose an accent nail where you would like to paint the haunted house on. Paint a big white circle using acrylic paint. This will be the moon. Position it near one side of the nail, and slightly above the center. This step is important for the opacity of the shimmer polish on the next step.
4. Fill the white circle with white shimmer nail polish using a dotting tool. This will give the moon some shine.
5. Allow the white shimmer polish to dry completely and while waiting, start painting the black cats on the other nails. Begin by painting a black oval shape for the cat’s head. Place the cats where you want to.
6. Paint the cat’s body—make the neck thin and the body curvy.
7. Paint two pointed ears on top of the cat’s head.
8. Add the cat’s tail by painting a curved line from below the face to the free edge of the nail. Make sure the bottom of the tail touches the body.
9. Dab white dots for the eyes using a dotting tool.
10. Paint a thin black vertical line on the bottom of the white dots. Use the same procedure to paint black cats on all the other nails.
11. Go back to your accent nail and draw an upward hill silhouette using black acrylic paint.
12. Draw a skeleton of the haunted house.
13. Fill in the house with black acrylic paint.
14. Continue adding details to the house by painting a chimney, a fence and windows. Use an orange polish or acrylic paint for the windows and door.
15. Apply a top coat.
Find Rina at www.rina-alcantara.com.