Now more than ever, it’s important to protect your data on the internet. At a time when most of our transactions are carried out online, hackers and scammers are finding more ways to access our information—some of which are available on our social media accounts.
Recent events have had more people take steps to protect their data on Facebook, but that shouldn’t stop at one platform—especially if you use a number of social media platforms on a daily basis. To help you secure your personal information across all of your accounts, we’ve put together a few more steps you should take:
Use two-factor verification
Creating a strong password is a good starting point, but these days that’s not enough to keep your account secure. The next step you can take is to enable two-factor authentication, which requires a code to be sent to your phone or through an authenticator app anytime you log into your account.
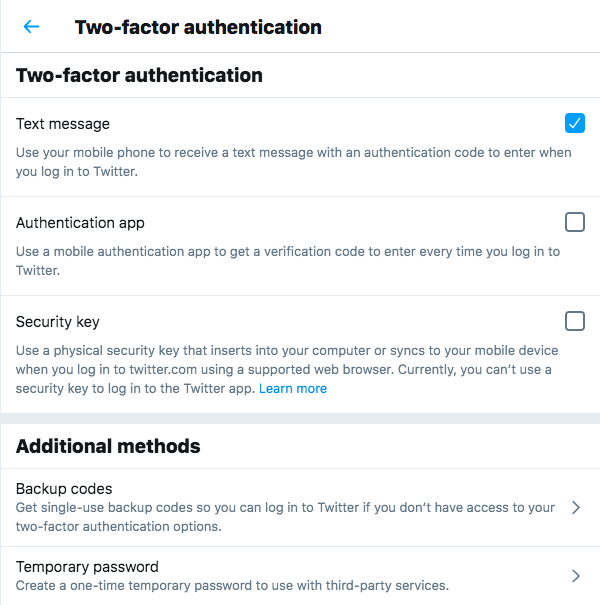
To enable this function on Twitter, go to the Settings page on the drop-down menu on your homepage, visit the Security tab under the “Login and Security” section and you should see an option for Two-factor authentication. Here, you can choose to set up verification through text message, an authentication app or a security key.

On Instagram, you can activate two-factor authentication by opening your account’s settings through the drop-down menu on your profile. Click on the Security tab and select the option for Two-Factor Authentication. Instagram gives you the option to send a text message or link an authentication app.
[one_half padding=”0 5px 0 5px”]
[one_half_last padding=”0 5px 0 5px”]
Keep track of third-party apps
While linking your accounts to sign up for services might sound like an easier option, it’s also a risky option because you might end up exposing sensitive data about your account to third parties.
To check which apps have access to your Twitter account, visit the “Apps and Sessions” tab under the Data and Permissions section. Here, you can see a list of apps and sites that you’ve used and remove access to those you don’t use anymore.
On your Instagram app, visit the Security tab and click on the option for “Apps and Websites” under the Data and History section. This section will show you a list of apps that have active or expired access to your account, and remove access to apps you don’t use anymore.
Protect your content
While you’re protecting your data against third party sites, it’s also important to make sure that the posts and pictures you put out can only be accessed by people you trust. You can do this by putting your account on private, so only people who follow you can see what you put out.
Twitter users can do this by opening the Settings page and opening the “Privacy and Safety” tab. Under the Tweets section, tick the box for “Protect your Tweets.” This will prevent your tweets from showing up on searches, and new followers will have to send a request to access your tweets.
Instagram users can go on private by opening the Privacy tab on the Settings page, clicking on Account Privacy and turning on “Private Account.” Only followers you approve of can see what you post, which posts you like and send you direct messages.
[one_half padding=”0 5px 0 5px”]
[one_half_last padding=”0 5px 0 5px”]
Manage photo tags
You may not have control over what people post about you, but you can control who can tag you in photos or even approve of what you can be tagged in before it goes public.
If you’d like to limit the number of people who can tag you on Twitter, visit the Privacy and Safety tab and select the Photo Tagging tab. You have the option to let anyone tag you, limit the function to people you follow or turn off the option to prevent anyone from tagging you.
On Instagram, you can limit the people who tag you and screen what you get tagged in. To do this, open the Privacy tab on the Settings page, and look for “Tags” under the Interactions section.
Header photo by dole777 on Unsplash
Get more stories like this by subscribing to our weekly newsletter here.
Read more:
For the not-so-tech savvy, a guide to keeping your Facebook account secure
The most valuable resource now is data–here’s how to protect yours from hackers
7 films on data privacy that will make you think before you click